- Home
- >
- Broadleaved Tree Seeds A-I by Latin Name
- >
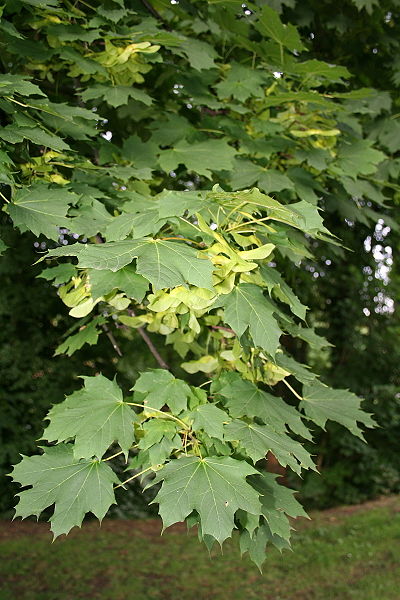
- Norway Maple (acer platanoides)
Norway Maple (acer platanoides)
SKU:
£1.25
1.25
4.5
£1.25 - £4.50
Unavailable
per item
Seed Prices
5 grams (approx 35 seeds) £1.25
10 grams (approx 70 seeds) £1.80
25 grams (approx 175 seeds) £2.75
50 grams (approx 350 seeds) £4.50
Although these seeds are from a good source they are not approved for forestry use
Use the drop down button below to select the seed quantity
This species of maple is native to eastern and central Europe and south-west Asia and is the most widespread maple in Europe.
Widely planted as an ornamental tree in parks, gardens and as a street tree in urban areas where air pollution, poor drainage, compacted soil and drought are common. It can also tolerate coastal conditions.
Relatively fast growing to 20–30m tall with a trunk up to 1.5m diameter and a broad, rounded crown turning brilliant yellow or occasionally orange-red in Autumn unmatched by most trees. Scented yellow flowers are produced in conspicuous clusters on the bare, leafless branches in early Spring followed by the familiar winged seeds in Autumn.
Grow in a moist but well-drained soil Norway maple prefers full sun, withstands hot dry conditions and tolerates ozone and sulphur dioxide air pollution. It is adapts well to extremes in soils from acid sands to clay and even calcareous. The tree is easily transplanted even at large sizes and usually grows away quickly.
Norway Maple seeds have a relatively short and uncomplicated dormancy that is easy to break down. Full information on how to do this is included with every order.
Germination, Sowing and After Care Information for
Norway Maple (acer platanoides)
Norway Maple seeds have a deep dormancy within them, this requires a degree of patience to overcome and it is usually quite easy to get high levels of germination if the correct procedures are followed.
First prepare a free draining substrate into which the seeds are to be mixed, this can be a 50/50 mixture of compost and sharp sand, or perlite, vermiculite or even just pure sharp sand has worked well for me. The chosen substrate needs to be moist (but not wet), if you can squeeze water out of it with your hand it is too wet and your seeds may drown and die.
Mix the seeds into the substrate, making sure that their is enough volume of material to keep the seeds separated. Place the seed mixture into a clear plastic bag (freezer bags, especially zip-lock bags are very useful for this -provided a little gap is left in the seal for air exchange) If it is not a zip-lock type bag it needs to be loosely tied.
Write the date on the bag so that you know when the pre-treatment was started.
The seeds require a cold period to break the dormancy that is naturally found within them, this is easily achieved by placing the prepared bag of seeds and compost mix in the fridge (4 Celsius or 39F) for 16 weeks. It is quite possible for the seeds to germinate in the bag at these temperatures when they are ready to do so, if they do, just remove them from the bag and carefully plant them up. Seeds that are ready to germinate will have become plump and soft. For small quantities I tend to just leave the seeds in the fridge and remove the germinated ones as they arise and plant them up. I find that this way you can get the maximum number to germinate. After a few months any remaining ungerminated seeds can have the cold pre-treatment process repeated again- several times if necessary.
For larger quantities it is easiest to sow the seeds in a well prepared seedbed once the cold pre-treatment has finished and wait for the seeds to germinate. Seeds that are ready to germinate will be plump and soft, if they are not, the pre-treatment is not yet complete or has been ineffective due to incorrect temperatures or incorrect moisture content of the pre-treatment medium.
It has also been found that fluctuating pre-treatment temperatures can give the best germination results and I have myself had excellent results by keeping the mixed seeds in a cold shed through the winter for the cold stage of their pre-treatment and allowing the temperature to fluctuate naturally.
Do not expose newly sown seeds to high temperatures (above 25 Celsius) otherwise a secondary dormancy may be induced and the seeds will not germinate until they have been pre-treated again. Germinated seeds can be planted in deep pots or plug trays in a good quality compost. Keep the seedlings well watered and weed free.
Growth in the first year is usually between 20 and 50 cm and usually trouble free. Allow them to grow for 1 or 2 years before planting them in a permanent position.


